I created this blog to keep tabs on by build and to share with the automotive community. Enjoy.

MODIFICATIONS

Blacktop 20v with T3 water kit and tweak'd cop harness
100mm and 50mm Sam-Q stacks with Pipercross filter
Poly Bushings
Techna-fit brake lines
Countless OEM wear parts
Fortune Auto Coilovers 8/6kg
T3 NRCA's
T3 "tall" short shifter
Cusco transmission mount
JDM kouki corner lights (fender)
No-name Strut Bar
Spin turn knob
Slotted Rotors with OEM or Hawk pads
TRD 4.778 Final Drive with T3 rebuilt kouki LSD
Various wheels. Current:
Hoshino Impul 14x8.5 -20
Rays Volk Mesh 14x8 -0?
Custom under diff exhaust
NST brake master cylinder stopper
NST steering lock spacer on aw11 rebuilt rack w/ t3 adapter
Sparco steering wheels with Boss hub and T3 billet extender
TRD shift knob
Momo Corse fixed back bucket seat
Tint 20%
Solex "twin cam series" locks
Fiberblass +25mm Fenders


PLEASE COMMENT OR EMAIL ME FEEDBACK:

pizotchi86@gmail.com

Search Marcus' Ae86 Blog

Saturday, July 20, 2013

Steering Rack Stiffening

Ever since I installed a manual rack on my car there has been this looseness. It feels like the rack is shifting causing the steering wheel to end up slightly off from strait each time I turn it.

When I installed the rack, I had to install the T3 manual rack adapter bushing to retain the power steering rack bracket. However, I didn't replace the other "D" shaped bushing. My friend Greg had duplicates lying around from this Prothane bushing kit for his mr2.

Since the engine is out and the 20v is on hold until I get an engine hoist, it seemed like a good time to hopefully solve the steering issue.

Now that the new bushing is installed the rack seems much stiffer. After installing these I realized how crucial they are to the steering input on the ae86. Being that the bushings are $30 for both this is a modification that all ae86 owners should not overlook. Have a nice day.


*

Monday, July 8, 2013

Pulling the 16v

After few hours of work the engine was ready to come out. The intake side doesn't have a proper lift hook so I bolted the chain to the head.


 I was excited to get this old motor out.


It looks like something lived in here. A lot of cleaning to do.


I must say, after pulling this thing out, the motor looks pretty sad.
Hopefully the swap goes well so I don't have to put it back in.


*

Tuesday, July 2, 2013

Blacktop 20v Swap Check List With Prices

There are already a few 20v blacktop swap lists out there. Figured I would contribute my idea of a "complete" list. The sections written in yellow are the routes I chose to go.

Blactop 20v engine ($1200 - 1500)
   -With or without harness depending on wiring decisions
   -With all sensors, distributor, coil, and igniter 
   -Did I mention all sensors; O2, IAT, TPS, MAP, etc.


Wiring (cheap - $550)
   -Make custom using 20v harness
   OR
   -Have somewhere like Tweak'd Performance make you a new plug and play harness ($550)

Convert cooling system one of these ways: ($50 - $690)
   -Convert to 16v flow by making a custom kit ($50-100)
   -Convert to 16v flow using Sam-Q's kit which can be bought through Battle Garage or similar  ($355 + source some hoses)
   -Retain 20v flow using a water line kit from T3 ($690) or SP-Tech (If available $550) (Don't do this - See later water kit install post for explanation)

Distributor Issue (free-$550)
   -Hammer firewall or cut and weld a box in it for the distributor to fit (free)
   -Buy a relocation kit from Sam-Q or similar ($550)
   -Run a waste spark system which you can wire in or have Tweak'd do for you. This allows you to run coil packs from a newer Toyota on the stock blacktop ECU. I am using 1zz COP's from a 2008 Corolla. Note you will still need your coil and ignitor for the signals.
(wiring from tweak'd $50) (coil packs $180-300) (Dist cover $90 at Battle Garage or make your own)
Some purists don't think a waste spark is proper, but many have run it with no problems. In my opinion it is a clean and cheap solution to the distributor issue. Plus it's just cool.

Fuel Line (free - $90)
 -Make one using one half of your 16v fuel line and the other half of your 20v fuel line. 
-Get Earl's fittings and stainless hose. Summit Racing had everything: two -6an banjo fittings, 3ft of -6an SS hose, and a fuel pressure gauge that mounts into the top of the fuel filter ($90) Here are the part numbers for all the fuel line parts needed:
807691ERL
RUS-640700                                                         
SUM-230603 
SUM-800160        

Other Stuff (some optional)
   -OEM 20v gasket kit ($250)

   -Timing belt ($38-100) Hydraulic tensioner ($74 from Battle Garage) Tensioner pulley ($78) I used an OEM belt, tensioner and pulley. It is crucial to replace these parts as the blcktop is an interference engine. Many people convert to a 16v pulley, but this requires a 16v oil pump, water pump, etc. I figure the engine came stock with the hydraulic set up so it should be fine.
    
   -OEM 16v Pilot bearing and throwout bearing ($30-50)

   -Clutch kit of some kind ($90-300)

   -Engine mounts ($100) if needed. I used OEM mounts for more vibration dampening 
   
   -Transmission mount ($80) if needed. I used a Cusco mount for more stiffness on the driveshaft

   -Rear Main Seal (Might as well do it while you're in there) ($20)

   -Electric fan set up, unless you run a 16v style water kit. The 20v waterpump isn't strong enough to support a clutch fan and is known to break. ($50-100) Tweak'd performance wired in a relay for me that runs off of the stock coolant temp sensor.

   -O2 sensor. use either the 20v one or an o2 from a 1993 mr2 non-turbo will work too) ($60-100)

   -Coolant Toyota Red coolant is best ($28)

   -Transmission Fluid Redline mT-90 is what i use ($30)

   -Engine Oil and Filter ($25-60)

   -Fuel filter ($25)

   -Coil on plug plate (custom =cheap) (Performance Options has one for about $90)

   -A couple custom mounts for the IAC valve and the MAP (free - $30)


Did I forget anything? Please let me know.


*

Tuesday, June 25, 2013

The Motor

Picked it up locally in Jefferson Oregon off a nice fella for 1200 bucks. Compression was good, I just hope everything else is too. Sorry for the cell phone pics lately.


*

Begun the 20v Swap Has

Today I officially tore out my harness to send out to Tweak'd Performance. They are making a brand new harness for the 20v blacktop, but they needed my old harness to source a few pieces.


It's kind of ironic that I was planning to start the swap today and my car died today. Well, it didn't die, but I left the headlights on for an hour and the battery voltage was down at 10v; effectively wouldn't turn the old starter. The last two days cold starts were getting rough and I believe my motor knew it was time to go. If any motor ever proved to be as reliable as this one has, I would be surprised.

On a lighter note, I'm so glad I never have to see this harness under my hood ever again! Goodbye!


Perhaps one of the greatest feelings when doing a project is obtaining all the parts. Kind of like when you're a kid and just got some new lego's. For now i just have this small box of things collected along with the motor. Including OEM(Toyota) front and rear brake pads, OEM motor mounts, OEM pilot bearing, OEM exhaust gasket, and some cheap serpintine belt. 

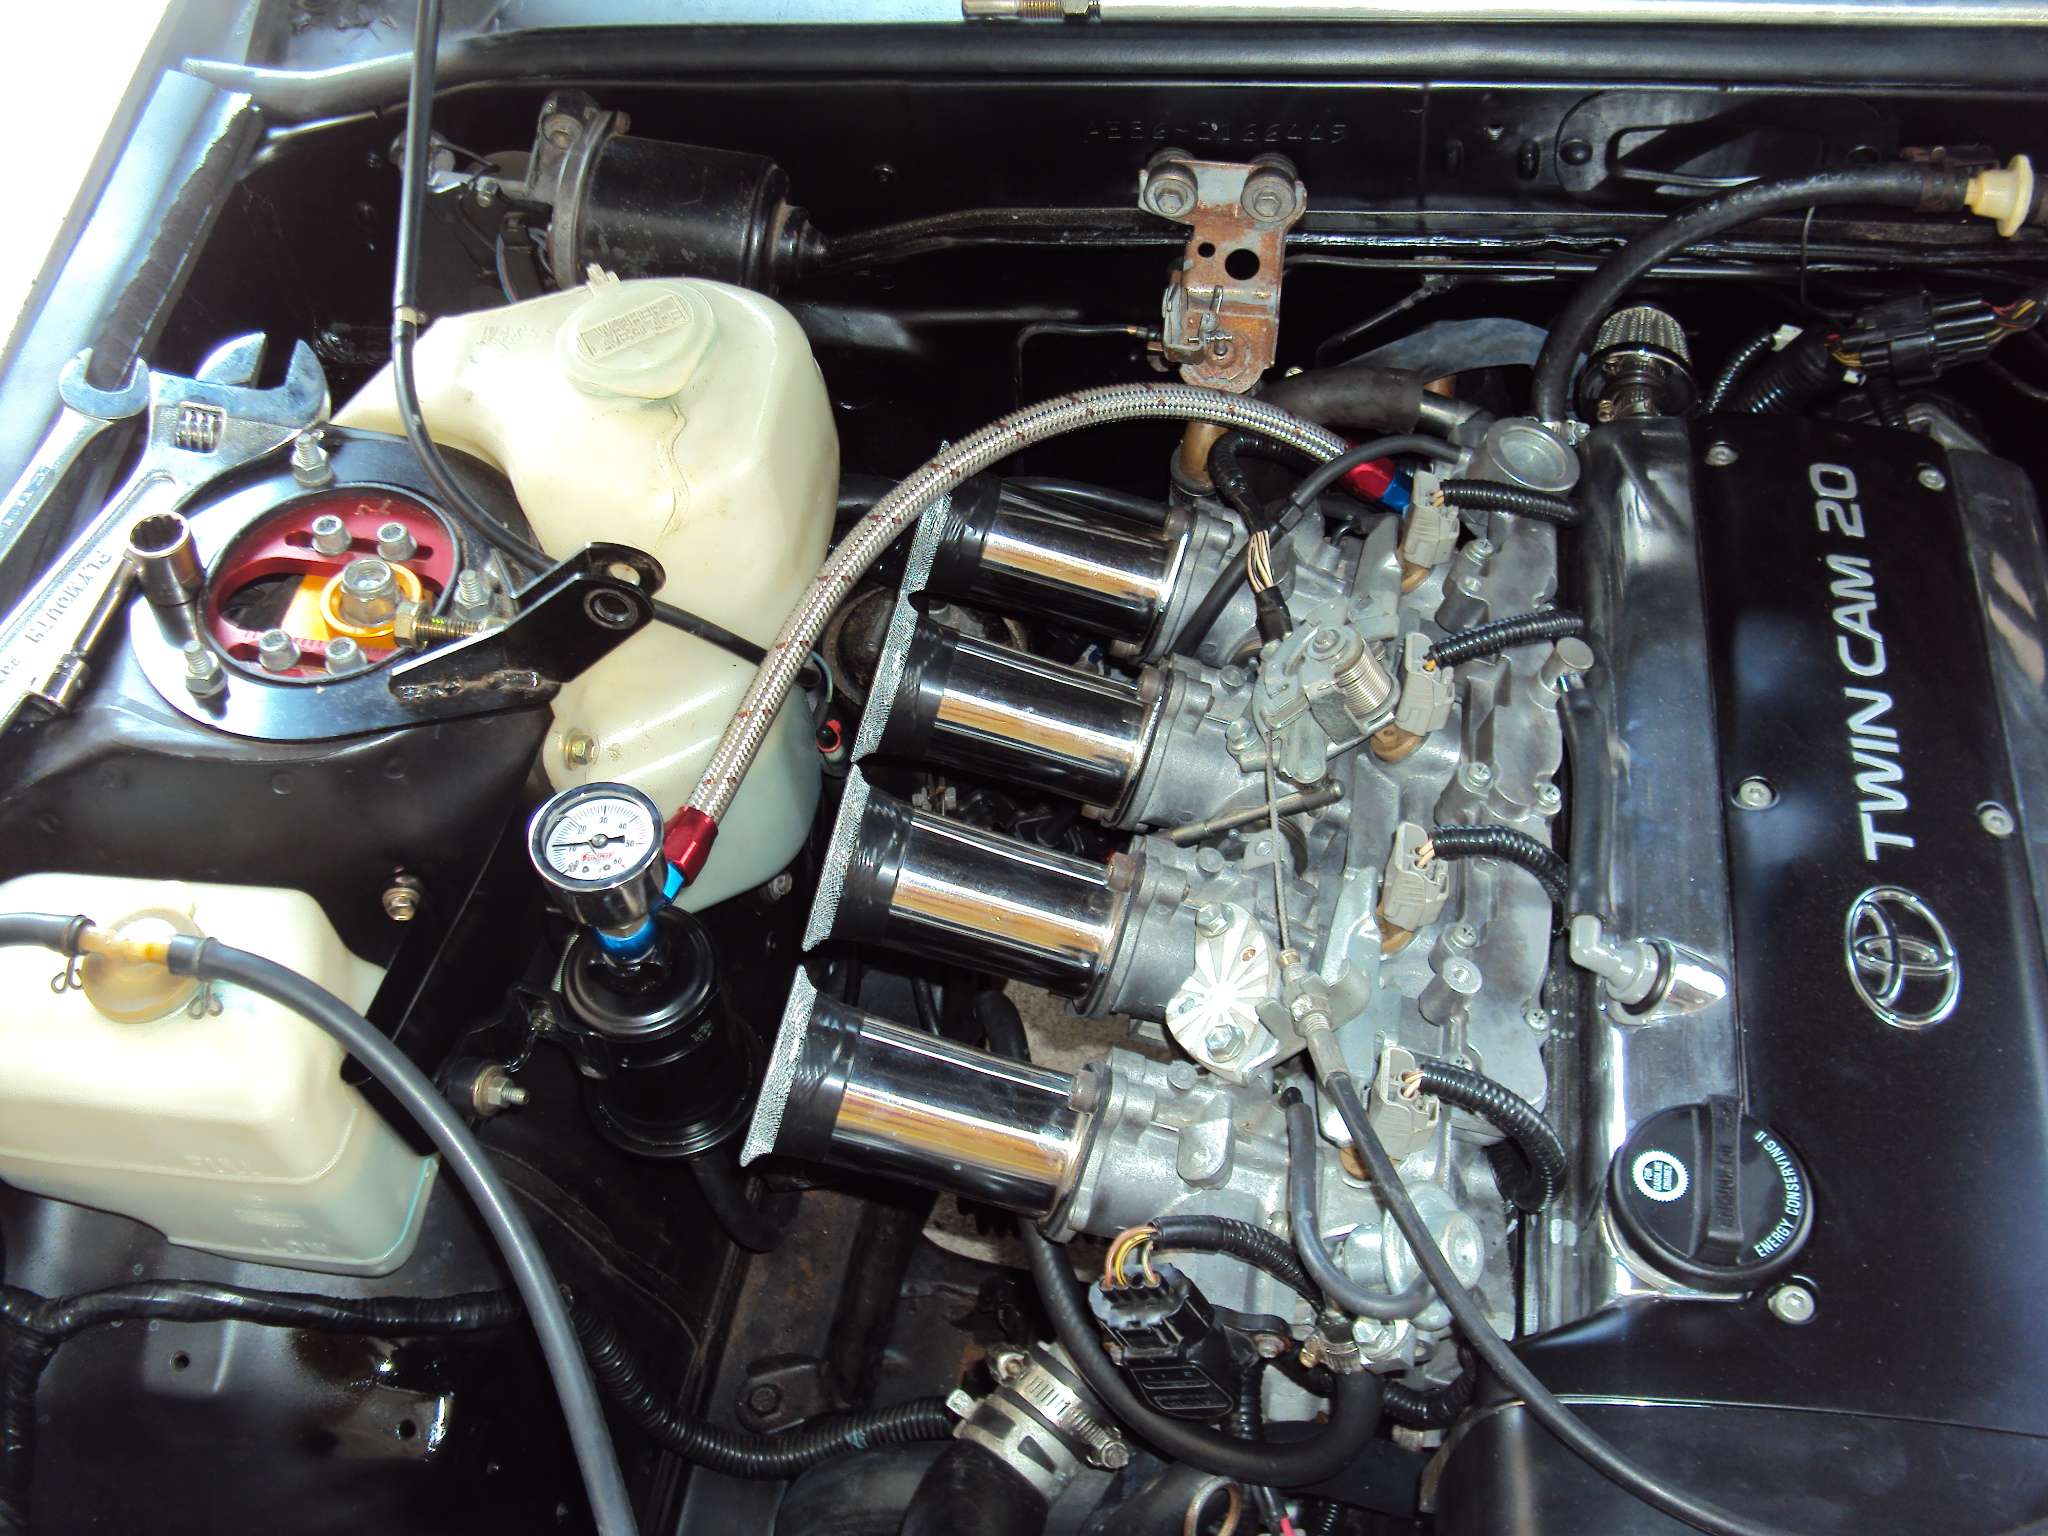
On the way in the mail I have a coil/ignitor, 1993 mr2 turbo O2 sensor by OBX, stainless steel fuel hose and Earl's banjo fittings with the pressure gauge set up from Summit Racing, and 1ZZFE coil packs to run a waste spark setup. Ignition and fuel line will look like this:

This photo was borrowed from morgan of club4ag.org in his 20v build that I have been referring to religiously

The only thing left I have to source is a water conversion kit, and an electric fan set up. Other than that all I have to do is send this harness in tomorrow and prep everything for the swap. Stay tuned for lots of updates as I meticulously swap my car over the next couple weeks.


*

Friday, June 7, 2013

Ae86's, Last of the Japanese Classic? Patina Worthy?

This black hatch belongs to my good friend Alex.


I love the look of layers of paint sanded down.


Keep Portland Hood, Alright?


*

Pictures of my AE86 at ITEM-B

I'm all about details, an example of this is the way I incorporated the brake master heat shield with the master cylinder stopper from NRG.


A picture of my car at ITEM-B, my shop/garage and my home.


Who remembers 76 antenna balls? So, utterly period correct for my 80's mobile.


BATMAN reverse light


Some Solex "Twin Cam Series". Love these things.


Corner Artist Style.


*

The Workhorse 16v 4age

Over the past six years my stock 16v has served me well. A 20v blacktop swap is in my sights. I should have the engine by the end of the month, stay tuned for updates as the swap begins!


*

Friday, March 29, 2013

Russia

Why is my blog getting so many views from Russia? Anyone? I can always have my girlfriend write some russian translations on my blog if requested. Though, japanese is much more my style. Why don't I have any views from Japan?

Friday, March 22, 2013

Corner Artist Logo Design

I came up with an idea to create a seal of sorts, for an elite group of automotive enthusiasts (aka my friends). Here is a series of photos showing the progression of the design over a couple days.


 It started out on the back of my school notebook. I saw the "metro goldwyn mayer" logo at the beginning of a movie and got inspired to replace the lion with a hoshino and make it my own.


Then I drew it again on a normal piece of paper and tried to generate some details.


Then i busted out an 11 by 17 inch piece of bristol and some micro's and got to it. The kanji symbol stands for "Car", and I just love the way it looks and what it represents.


 At some point I started taking pictures in inverse, to see what it would look like when made into a white vinyl cut sticker. I actually used the inverted photo technique to help me decide how to draw it.


This is the complete. The size of the sticker will be about 14 inches wide. Having shirts made is a possibility.  I'm not 100% satisfied with my "Corner Artist" cursive font, but at least it's hand drawn.


The shop that printed up the vinyl stickers is located in northeast Portland. Their shop is called NO LIMITS. Click the link below to see a video promo for their shop!


*


#cornerartist #ae86 #underground #blackbelt 

Thursday, March 14, 2013

Blog To Blog


My car got featured by item-b today. Check it out!


The FC in the picture is one of the cars my friend Evan (owner of item-b) is currently building. Check out his very creative blog:


*

Wednesday, March 6, 2013

Check out my instagram profile where you can see the cars I drive at work and the various things I do.

INSTAGRAM


Sunday, March 3, 2013

Attributes

Thankyou, Club4ag & HachiRoku. Because of these communities I am able to find parts for my car that would be impossible without internet.

Picture because no post should go without a picture. Have a nice day.


*

Friday, December 14, 2012

Short Lived Dilemma

I parked out side of Noodles and Company the other day and one of the cooks came running when he saw my car. He was so excited, he couldn't stop circling the car with his hand covering his mouth saying, "This thing is so sick! I want one so bad!" So I started talking to him, and he pointed to his car and said he wanted to sell it and get an ae86. He was driving a Subaru STI. It's funny that a driver of one of the most technologically advanced driving machines on the roads today, would rather drive a ratty old ae86. So I jokingly asked if he wanted to trade. He replied, "I'm so sick of that thing I actually would." My heart stopped for a second, not because of how ridiculously good that trade would be for me financially, but because he was putting me in a hard place. How could I even consider trading my baby that i have been building for over six years? But it was so tempting because I know I could afford two nicer ae86's than my own for the worth of that STI.

There is something to be said for driving a car that you have built yourself. When you have a bond with a car like I do with mine, you start to get to know the soul of the car, mainly because you built the soul yourself. This is precisely why I could hardly stomach the idea of trading it off. I will take this encounter as a sign that my car has come a long way, finally receiving the appreciation it deserves. It's funny that cars are judged by how they look on the outside just like people. I respect a person for who they are on the inside, just like a car should be respected on how it is built from the inside out.


*

Friday, October 26, 2012

Staying Classy

Haven't had much time to work on the car, but it's running daily as usual. So busy with school but i decided to throw a few shots up that I took recently. Enjoy.

          Purple 


My friend posted up out at PIR. The place is like a ghost town most of the time.


*

Wednesday, June 20, 2012

Monday, August 22, 2011

Build it, don't buy it!


By building your own car you increase your knowledge of your vehicle. Plus any work you put into your car, you own. You can never guarantee the quality of work some one else did when you buy a pre-built car.


*

Sunday, April 10, 2011

Found old pics

I believe these are from the 8/6/06 meet in seattle.


These are from the seattle to portland meet:


    I am not a huge VW fan but there's something cool about these old bugs. My friends bug:


    And this is someone elses bug:


*

Monday, February 21, 2011

Sunday, November 14, 2010

Slowly Building...

Well, the GTS rear is in and feels great! The slotted rotors are going on this week along with these:
Cusco camber plates. And let me say, those pillow-ball mounts are incredibly tight! I got these locally. Delivered to my door!


*