I created this blog to keep tabs on by build and to share with the automotive community. Enjoy.

MODIFICATIONS

Blacktop 20v with T3 water kit and tweak'd cop harness
100mm and 50mm Sam-Q stacks with Pipercross filter
Poly Bushings
Techna-fit brake lines
Countless OEM wear parts
Fortune Auto Coilovers 8/6kg
T3 NRCA's
T3 "tall" short shifter
Cusco transmission mount
JDM kouki corner lights (fender)
No-name Strut Bar
Spin turn knob
Slotted Rotors with OEM or Hawk pads
TRD 4.778 Final Drive with T3 rebuilt kouki LSD
Various wheels. Current:
Hoshino Impul 14x8.5 -20
Rays Volk Mesh 14x8 -0?
Custom under diff exhaust
NST brake master cylinder stopper
NST steering lock spacer on aw11 rebuilt rack w/ t3 adapter
Sparco steering wheels with Boss hub and T3 billet extender
TRD shift knob
Momo Corse fixed back bucket seat
Tint 20%
Solex "twin cam series" locks
Fiberblass +25mm Fenders


PLEASE COMMENT OR EMAIL ME FEEDBACK:

pizotchi86@gmail.com

Search Marcus' Ae86 Blog

Monday, March 21, 2016

Getting Ready For The Season

Over the last few months I have been collecting parts. First thing that needed my attention was the transmission as I bent a shift fork back in December and haven't really driven the car since. With thoughts of preventative maintenance I have decided to upgrade my transmission to a w58 from a Supra. To do this requires some custom pieces I am still obtaining. Once the swap is complete I will do a thorough write up; for now here is a short list of the required pieces:

W58 from a Supra
4age Bell-housing
Sam-Q 4age to w58 swap kit
A 200mm or 212mm custom clutch for w58 splines (4age clutch disc and w58 splines)
Ae86 pressure plate
A custom cross member to suit the w58
A custom driveshaft or possible connecting of w58 front half shaft to ae86 rear half shaft


In addition to upgrading the transmission I have purchased a body kit. I have an incredibly refined taste in everything ae86 and especially visual parts such as body kits i have my preferences. I have decided to go with a goodline (muscle bear) style front bumper, and run free side skirts and rear bumper; all fiberglass replicas as buying authentic would be a waste of money once the body kit gets damaged drifting at the track. I am making custom bash bars and brackets to hold the bumpers and a small write up will come for that too once the kit is mounted.

The last thing I have to do is weld the exhaust back on as it broke off at the last event as well. And I'll pick up some good tires for the front to last through next season. Stay tuned and thanks for reading. Here's a nice picture of me running tandem with another coupe someone snapped at the last drift event.


*

Thursday, June 4, 2015

Fortune Auto Coilovers Review - Ae86

I got my set of Fortune Auto Coilovers for the coupe. Here are my thoughts:

The quality of parts seems really nice. Everything is a perfect fit except one thing. The adjust collars on the rear perch have a bottom in them like a cup. Even with the bump stops completely off, they are an inch away from seating around the base of the collar. They bottom out on the bump stop mounting location. Solution? Saw off the bump stop perch. They aren't structural and cut very easily.

After a day of drifting at Pats Acres this weekend I can say, they perform great. They absorb bumps and undulations while sliding like butter. I still need to tune them in a little more, but they were doing what I needed. Oh, and you can slam the shhh out of it if you want; shocks adjust shorter than you'll ever need.

On the freeway they ride over lane change bumps smoother than my TRD/agx setup did. So, the digressive shocks are working.

These run about 1250 shipped from Battle Garage RS (without spindle). I think the extra 300 over megans or bc's putting them in the price range of Stance coilovers is a fair price after evaluation. Well see how they do through the season at PARC! Thanks for watching.


*

Saturday, October 18, 2014

Photo Session

I got my hands on a decent camera for once. In attempt to satisfy some photography class assignments I went shooting. Keep in mind, I'm a beginner photographer, shooting in manual mode, and these are unedited...excuses, excuses.


*

Thursday, March 27, 2014

Trumpets!

Today I installed my new 100mm stacks with the Pipercross filter set up. I was very pleased with the fitment. Isn’t it beautiful.


Even with the filter on there is a sufficient amount of room for all the components around it. I think I could even fit the windshield washer bottle.


I also got around to installing the SS brake lines today. I will be racing soon! All of the intake parts here are available from Battle Garage Racing Service.


*

Monday, March 3, 2014

Filtering the 20v

To filter the 20v I decided to use the Pipercross filter and SQ adapter plate from Battle Garage.

The use of this style of Pipercross allows space for 100mm velocity stacks!


I also picked up some stainless steel brake lines and a little hood support clamp. It's all in the details. The stacks will be here in a few weeks and I will upload a new video.


*

The 20v Running Clip

Even though I have not been updating the blog much, the 20v is running pretty good. There is the low rev-limit issue (about 6800), but other than that it seems to be a flawless swap. I have ordered 100mm stacks and a filter set up from Battle Garage, one of the most punctual and quality up and coming distributors around.

When I get the Corolla on the road again I will head over to my buddy Evan's shop at item-b here in Portland to have him shoot some HD video of the motor.


*

Tuesday, December 17, 2013

AE86: Myth or Legend?


Is the potential of the AE86 a myth or a legend? Can it perform outside the context of a manga?


 My Initial D collection, a gift from my oldest and best friend Devon, a man who loves corolla's even more than I do.

The answer is yes. However, the ae86 in classic tuning form only shines under certain parameters. The conditions are low speed drifting, and low speed tight corners. I have noticed the ae86 is especially quick with switchbacks. (meaning changing direction, inersia, weight shift etc.)

Because of the iconic nature of the AE86 many builders choose powerful motor swaps, like a F20 or SR20 to perform with the newer cars. At what point has the build gone so far that you might as well buy a faster car from the start? Or is it cooler just because it's a challenge?


What it comes down to is, build the car you want, the way you want.


*

Thursday, September 26, 2013

I'm Famous!!!


A couple folks have asked me for advice with their AE86 endeavors. So here is a shout out to them and a thanks for following my work.

Max
Vikrum


Thanks for following fellas!


*

Sunday, August 18, 2013

She's Alive!!!

Finally got the 20v running. It's revving smooth and idling well. The only problem is the redline is at 6800 rpm. This thing should rev to at least 8 so I have some more tuning to do.


*

Tuesday, August 6, 2013

Happy 86 Day!!!!

August sixth has become something like the AE86's birthday. All around the world people are celebrating the iconic sports car that is the AE86. I've owned my car for over six years, the soul of each individual AE86 will only become apparent with this kind of devotion.

Keichi Tsuchiya said, "The 86 trains the driver", which became a quote in the popular Initial D. This is a very true statement, the car is not for the impatient, light-hearted driver. You must succumb to the apprenticeship the AE86 has to offer and become the car's slave in something similar to Pie Mei from Kill Bill.

Unfortunately my car is still waiting for a proper ECU which is in the mail from Japan. The swap has become a much lengthier endeavor than I had imagined; it will all be worth it when it finally runs.

August sixth holds even more historical significance, it was the day the Americans bombed Hiroshima, Japan. I have visited the tribute museum in Hiroshima and sensed the severe pain the people had to endure.

Regardless of anything the Japanese had to endure, they always prevail in any circumstance. With one of the hardest work ethics on earth, it's no wonder they can create cars as fun, iconic, and beautiful as the AE86.


*

Friday, July 26, 2013

More 20v Blacktop Progress: Custom Mounting and Earl's Fuel Line

Everything is coming along nicely. Today I custom mounted the ignitor and coil, installed the Earl's fuel line with a summit racing guage, and installed the exhaust manifold after minor grinding.

The Tweak'd Performance harness left me very little slack to mount the coil and ignotor. Since the ignitor is smaller I bolted it right above the booster as shown. Went down to the local hardware store and bought some allen bolts and nuts for a clean look. I just pulled the vent out to access the space behind the allen heads to put the nuts on.


The coil was not going to mount well in that vicinity so I extended the two wires using solder and shrink tubing. This allowed me to mount the coil down where the stock 16v coil mounted before. Since I am not actually using the coil to fire (just for the signal) it doesn't matter where it's mounted as long as it's plugged in. I had my friend Aaron (a fabricator/welder) fab me up a bracket to hold the coil using the stock mount location. I'm happy with the results on the bracket, I threw some Rustoleum red paint and some allen hardware on there too. 


I tried to mount it as tucked as possible in the stock location, fitting perfectly under the fuse box.


Another problem I had to solve was the large vacuum port on the manifold for the first cylinder. So I found a bolt with the same thread pitch and cut cut it shorter to plug the hole. If it's too long then it portrudes into the airflow, if it's too short it would leave a little valley where the air flows. With a little trial and error by opening the throttle plate and looking inside with a flashlight, I got the bolt to the right length.


It is this bolt right under the tps sensor:


I was excited to put the fuel line in today, so I put off eating and spent an extra hour hooking this up. I had the choice to run the SS line up above and come down on the connection on the fuel rail, or tuck it underneath and come up to the fitting on the fuel rail. I chose to tuck the fuel line underneath, it's not like people won't notice it and it serves it's purpose. I'm big on making everything as minimalistic as possible under the hood while retaining functionality.


 If you would like to get the part numbers for all the fuel parts needed including the gauge, check my 20v swap list with prices post.


The fuel line comes through nicely with minimal rubbing on any components.


Here the fuel return line and harness were running parallel so i zipped them together. I'm a little worried about the return line being so close to the water pipe, but I did retain the stock foam sleeve.


*

Wednesday, July 24, 2013

Explicit 20v Blacktop Progress: T3 Water Kit Install


I finally got my hands on a cherry picker and dropped the engine in the other morning by myself. This whole swap has been a 100% solo mission.


Attempting to install the Techno Toy Tuning 20v Water Kit presented multiple issues. First I noticed the lower water pipe was aiming straight at the alternator. So I cut one of the silicone elbows shorter on one side to tuck the pipe under the alternator. Most people who use this kit either route the lower pipe around the alternator, or over the top of it (with a 16v alternator mount). Since I am using the 20v alternator mount, I had plenty of room to run the piping underneath. This made the stock shape of the lower hose useless, so I ended up using the upper hose (as it is a straighter hose) on the bottom and a section of the lower hose for the top of the radiator. This gave it a nice tucked appearance when viewed from the top. By the way, the 20v alternator bracket will hold the 16v alternator perfectly, and lines up with the stock 20v pulleys fine. I deleted the 20v free spinning pulley and used the stock 20v serpentine belt.


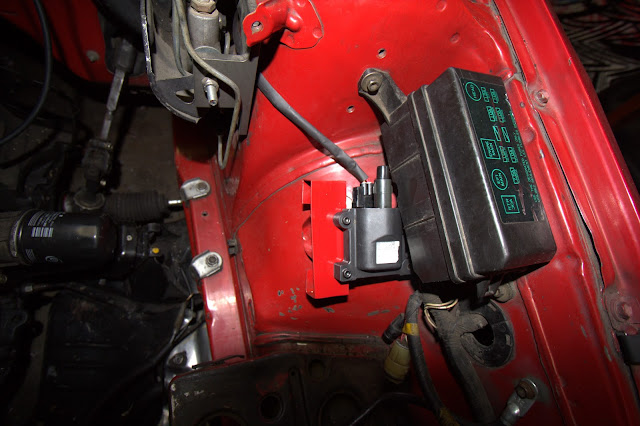
Another thing I had to solve was the top alternator bracket.  Because I'm using the 20v alternator mount, it was rubbing against the top hardline, so I had to grind a little area for it to fit. Another modification can be seen in this picture where the hard lines mount to the water neck on the head. I pulled out the stock stud and got a longer one. The mount wouldn't fit underneath the nut on the stock stud. It's hard to see but the mount is actually on top of the stock nut allowing it to fit, and then secured with another nut. Providing the water neck a devoted nut allows me to remove the water pipe bracket without breaking the seal on the water neck in the future.


With the silicone elbows in place on the back of the head, the heater control valve would not fit in the stock location. So I just moved it to the left and secured it using only one stock bolt for now.


Ran into some issues with the fitment of the stock molded heater hoses. They didn't fit in stock locations what so ever. It broke my heart, but I had to chop up my brand new silicone ae86 molded heater hoses. Each heater hose was used in an unintended position but it worked; it's a really tight fit. Another problem was the inlet for the heater core outlet on the bottom of the T3 machined block. I only needed 4-5 inches from one of the heater hoses to reach this port. I found it strange that the inlet on the T3 water block is smaller than a stock heater hose port. I just clamped it on so hopefully it doesn't leak. This hose is in a really tough location right above the bell housing and virtually impossible to get to once the transmission is installed. Here is the best angle I could get on the stuff going on back there.


Over all I am very pleased with the water kit. The heater hose situation is a little annoying, but it looks really clean under the hood. Soon There will be posts covering the harness install, custom mounting of various things, and the install of the earl's fitting fuel hose set up. One more picture for the "20v ae86 under hood" Google image searches:


****EDIT**** It is now September 2015, So i have some issues to report with the water kit:

First off, it is incredibly prone to leaking. I had to take the block off the back of the head again due to leaking which is tough to do when the engine can't lean forward. I had to use a sealant and order another gasket to get it to seal.

After installing two different Summit Racing Heaters (both of them leaking within a weak of usage) I came to a realization. I noticed when I shut the heater control valve it would leak right of of the valve. But when I opened it the leak would stop. Basically the T3 kit isn't designed for any kind of restriction through the heater outlet. Which is a very bad design. The heater outlet is a pressure line, meaning it comes from the water pump and it has to pass through to get to the next water channel. Heater cores are restricted by nature because the water must pass through small channels in the core. Therefore, the high pressure was blowing heater cores and refusing to stop when the heater control valve was closed. All of this cost me time and money and it was a huge inconvenience. T3 should have added a channel that would allow a bypass of the pressure to the next port for when the heater control valve is closed. The final consensus: Don't buy the T3 water kit. Buy Sam-Q or make your own.


*